Interesting things that I've learned over the years for calibrating astro-images with my Pentax K10D camera.
The Pentax K10D camera is an older design, released back in 2006 when Pentax was an independent company. Since then, it has passed through the hands of Hoya and now is a part of Hitachi. I'm not sure of what will happen with the Pentax name, but for now, it remains an independent brand.
As some context for why I'm using Pentax for my astrophotos, the short answer is "use what you have." The long answer is that I already had an investment in old glass and wanted to continue to use it.
A major feature of the K10D body is that it's the last of the APS-sized, CCD-based sensors for the Pentax line. Other manufacturers do still offer CCD limited to full frame sizes. This sensor provides great low-noise characteristics at the expense of lower sensitivity. The sensor also does not generate as much heat when exposed, meaning long exposures are not subject to as much washout from thermal noise.
Disadvantages of using an off-brand camera is that there is little support for the system in the amateur astronomy community. There is only one tethering software available once available from Pentax. This does mimic all the functionality of the camera on a computer. It does limit the ability of taking only 9 consecutive bulb exposures.
These barriers are just minor roadblocks and so long as I remain active near the computer, I can continue to restart another sequence of nine photos. If I really have to handle more than 9 shots at once, I can always use an intervalometer or the Stark Lab's DSLR Shutter.
At the beginning, I was using the camera unmodified, living with the IR cutoff filter. This filter is fairly aggressive. I have found one place that continues to do conversions for this camera and they have posted a frequency transmission curve for the stock filter.
http://www.kolarivision.com/internalcutfiltertransmission.html
Note how this stock filter has a small amount of sensitivity at the 680 nm range. This allows a slight ability to capture Ha regions.

Later, I started using the DNG format over the PEF raw format. The advantage was that DNG formats could be read by more software. Storage space was no longer much of an issue as SD cards reduced price.
Converting to Full Spectrum
In 2011, I was convinced that I wanted to have a K10D converted to full spectrum use. I engaged Spencer's in Colorado to do the change. The process only needed about a month and a half to do the work. I did opt for the "thermal" option. At the time, I thought it was a good idea. In the end, I'm not sure it was (or did) anything.
Quickly, I could see that the response was right where it should be - Ha regions popped. I could also see UV regions as blue halos around stars. Unfocused wavelengths are a problem. If I were to do it again, I'd have an astro-conversion that limited UV and Near IR (wavelengths above 700nm). Full spectrum is nice for a hand-held or studio camera, not so great for astronomy.
For about a year, I used the camera in this fashion, letting it run filtered only through the Baader Moon and Skyglow filter. This filter acts as a slight red-enhancing filter with UV/IR blocking. Eventually, I started using the IDAS LPS P2 filter which works much better although it does not block NIR.
Back to the topic of calibration...
I was originally using Deep Sky Stacker to do calibration, following the instructions repeatedly trying to get better results. I ran into and solved significant problems.
I had struggled with the decision of what ISO setting to use. Here is one place where using a non-popular camera makes a difference. If I had been using a Canon camera, most of these questions would have been already researched. I had to figure these out myself.
The general rule of thumb is that you'll want to use an ISO setting that is as low as possible to provide good data space. This choice is tempered with the need to bring the "signal" out of the range of the readout noise. This latter point is very important for CMOS sensors that generate noise that may be amplified later.
For CCD senors, the readout noise is usually very low and may not need to bump up the ISO setting (gain) to reach that threshold.
I was still left with a nagging issue even after calibration. There were problems of gradients across the field - especially at higher ISO settings - and there was amp glow. These had be solved by two methods.
The residual gradient problem was eventually solved by lower ISO settings, better/more flats, and by using DBE in Pix Insight. Seeing a stronger gradient in the higher ISO settings was a big clue that this was an issue of how gain was applied by the camera software. Getting more saturation in the flats was as easy as bumping up the manual exposure setting. Using DBE continues to be an experiment to find the best settings.
The amp glow problem was something that I spent a lot of time working and reworking data sets in DSS. The software provided options for scaling darks to match lights on a linear method. It expects the darks to match the lights not only in duration and ISO setting as well as in temperature. It was only after some time investigating that I began to collect a library of darks to match temperature.
To aid the matching exercise, I use a BAT script run with EXIFTOOL to capture the temperature and write it out to a tag. In Windows 7, the tags can be displayed in the file manager and thus files can be sorted by tag.
By matching darks to lights within 1 C, much of the linear noise profile in the light frames is controlled in DSS. However, there continued to be issues with amp glow.
I tried to resort to controlling the temperature of the camera. I picked up a Tellurex TEC that was used to cool the camera body. This was done in the hopes that cooling the camera would improve the noise. It did. What it also did was stabilize the temperature of the camera so that it did not vary so wildly over a session.
This still did not eliminate the amp glow.
I experimented and put the camera in the freezer to see if the amp glow ever went away. Not really. As expected, the effected area got smaller. The amp glow remained strong in its area.
I finally tried calibrating with a demo version of Maxim, based on the suggestions that it was able to handle amp glow better than other calibration techniques. To my surprise, it did such a better job than DSS that I immediately picked up a full license.
Using Maxim for Calibration
Now to the meat of things.
Here are the settings that I use for success with Maxim and why:
I calibrate with Maxim on my desktop rather than in the field. Since the DSLR does not talk to Maxim, there is no need to bog down the laptop with the extra step.
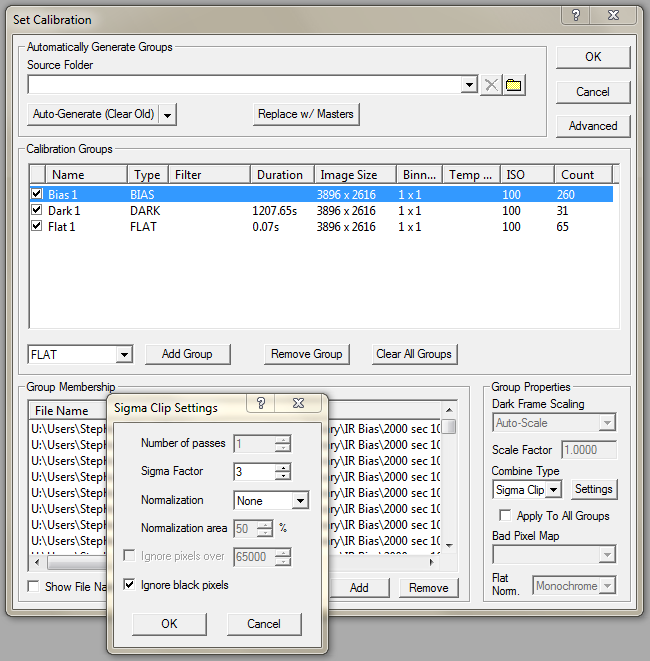 Bias:
Bias:There is no reason not to use a large amount of bias files. Do think about the rules of diminishing returns. The square root rule matters to determine the increase of SNR. 2 images gives an increase of SNR of 1.4, 4 images gives 2, 8 gives 2.8, 16 give 4, 32 gives 5.6, 256 gives 16.
Since shooting Bias is so easy, go for 256. Using more just slows things down more than necessary.
Also, for Bias, I shoot at one stop slower than the maximum shutter speed. This seems to help make for consistent readout values.
Additionally, I use a sigma style stack to help control outliers like cosmic ray hits. It's also important to not normalize Bias files.

I use as many as I can that are matched to 1 C of the target temperature. I'd like to use between 15 and 30 darks. When I have more than 30 darks, I start sorting by age and will use the newest ones since hot pixels tend to appear.
Note the SD Mask settings for number of passes and Sigma Factor. This is special because it allows robust profiling of the amp glow areas. Also notice that Dark Frame Scaling is turned off. This keeps Maxim from trying to stretch the dark frame to match the light frames.
Note the use of a custom pixel map. I maintain a good pixel map of hot pixels that I update periodically. This map helps to ensure that the worst hot pixels are removed during the calibration procedure.

While a good number of flats is always useful, it can be a pitfall. Flats fire the shutter, moving the mirror and possibly stirring up dust that might rest on the sensor. Thus, taking many flats may move dust motes around that otherwise have remained stable during a session. Mirror lockup must still be used. I try to gather between 21 and 64 flats.
Note the SD Mask settings. The sigma factor of .5 is rather generous, allowing light falloff and dust motes to be caught. The normalization procedure helps with OSC and dust. The normalization area avoids the edges of the field where light fall off is the worst.
The Flat Normalization setting of Bayer Planes is critical for using OSC cameras. It tells Maxim that there is a color filter array in place and that it should be bayer-aware. I'm not clear on if it tries to debayer the flats or if it just references the R/G/B pixels for normalization.
As a closing thought about flats, it's important to take them every time the camera orientation is changed. I've been able to see that dust may be stable over the course of a night, but it will change when the scope is parked and reparked. Even leaving the camera fixed on the telescope and stowed will allow dust to move. Lesson to learn is to take flats at the beginning of a session if possible and absolutely at the end of a session.

The advantage of this control panel in Maxim is that you can add a pedestal value to keep data from being non-negative in calibration. Since DSLR makers tend to rescale darks to a truncated data set, there is a possibility that a calibrated frame might have issues on certain pixels. Using a shoulder seems to help. The default value of 100 wasn't enough for my camera, so I bumped it up to 300.
The rest of the check boxes show what will be done with the bias, flats, and dark frames. Since my flats are relatively short, there is no need to dark subtract them.
Batch Save: This is the last step. Once the Set Calibration menu has been populated with files for each session and temperature, the files that will be processed are added to this Batch Save menu. Note the Fits and Size format setting. While Maxim can output 32 bit FITS, DSS can't handle these for input.
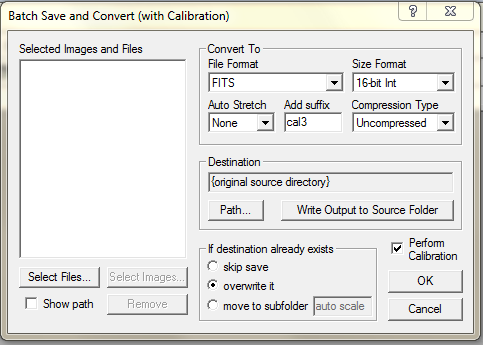
I do not generate Master Frames with Maxim. There is something strange about the way Maxim averages the data that keeps it from handling the amp glow properly. Instead, I let it regenerate the master set on the fly. It does mean that calibration may take 15 minutes or longer. The advantage is that the data is better for the wait.
Note that once I've processed the images, I am left with non-debayered FIT files. These still have the grid in place and show up as black and white if I bring them into Maxim or Pix Insight. I've yet to work out good color settings for them. Instead, I usually do the stacking step in Deep Sky Stacker which will debayer at the same time.
This sums up my experiences so far with calibration techniques.
I'd like to revisit the tools in Pix Insight eventually. It has come a long way from the start. When I tried it, there were problems with removing hot pixels and the amp glow was over corrected. Things may have gotten better.
Comments
Post a Comment